

It’s finally here.
Campless Collections.
a.k.a. Sneaker Portfolios.
You’re welcome.
<mic drop>
—-
OK, we’re back…
This one’s been a while coming and we’ve got a lot to say.
Welcome to Collections
The single most requested feature over the past 73 weeks has been sneaker collections – the ability to see the value of your collection. Not coincidentally, the single feature we’ve most wanted to build, is sneaker collections. But up until a few months ago, we didn’t have the resources to build it. And then we met Dan Gilbert. And now we have Collections.
Collections is exactly what you think it is, but we’d still like to explain it, in as much detail as possible. You can now create a personalized view of what YOUR kicks are worth. But wait, there’s more. The flip side of your Collection is what you want to buy – so we’ve created Cop List, too. Now you can track the kicks you’ve been lusting after, how much you need to save and can watch prices to determine the best time to buy.
Sneakerhead Data for You: At a glance, you’ll be able to see the market value for every sneaker in your Collection, as well as the aggregate value for your Collection as a whole. By tracking how much you paid for each shoe, we’ll calculate how much you’ve gained or lost on each pair. You can separate out DS vs. used pairs, and the value of your Collection will reflect the condition. You’ll be able to see how your Collection ranks versus the entire Campless community on any number of stats, including total number of sneakers, total collection value and average price. And those are just the features we can remember right now…
Limitations: Unfortunately, Collections and Cop Lists are limited to the sneakers that we currently track – now at 1,752. But that number is always growing; we add more sneakers to the site every day. If there’s a particular pair you’d like to see us add, please let us know here.
As a fan of “choose your own adventure”, we’ll let you decide where to go next:
- Dive right it. Start creating your Collection and figure it out yourself; or
- Keep reading below for details on how to use Collections…
THE SNEAKERHEAD GUIDE TO USING CAMPLESS COLLECTIONS
Collections Overview
You’ll notice a new section at the bottom of the left hand navigation bar: Collections. From there you can get to your own collection via “My Collection”, but can also see everyone else’s collection with “Browse Collections”.
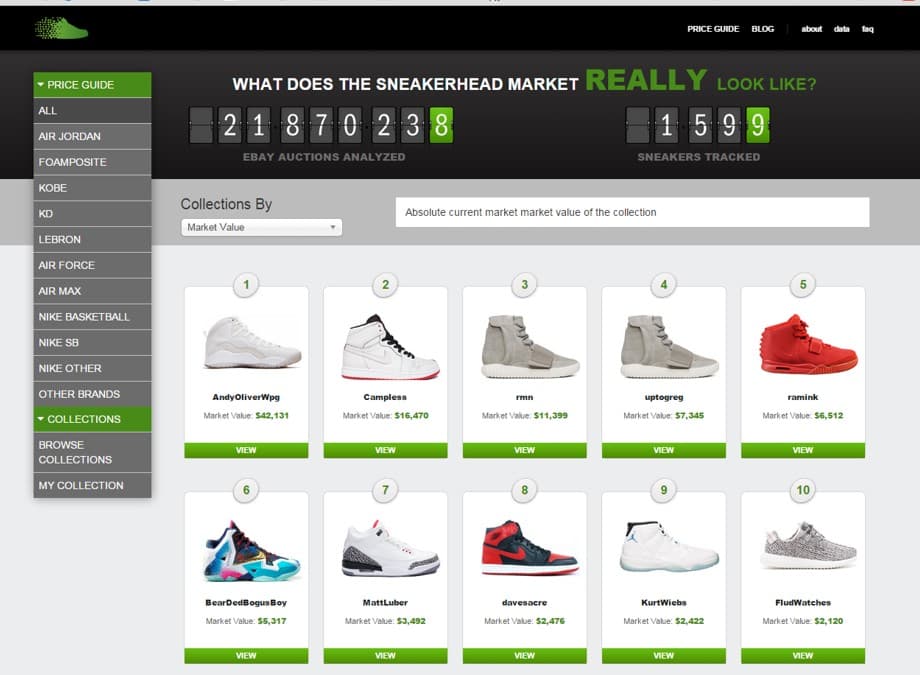
Browse Collections
You can view every collection on Camplesss in the same manner in which you previously viewed the Price Guide – with a “sneaker card” – only each card now represents an entire collection. And just like the Price Guide, you can use the drop-down menu to sort and rank all Collections by:
- Market Value
- Total Profit
- Price
- Sneakerhead Significance
- Total Sneakers

The picture you see on the sneaker card for each Collection represents the shoe with the highest Campless Score in that Collection.
You can click on the sneaker card to view the contents of other Collections . . . and then call them out for saying they got all nine Yeezy’s. Actually, you can’t call out people yet because we haven’t built a comment feature, but maybe that’ll happen in Collections 2.0.
Why are Collections public?
Because what’s the point of having a collection if you can’t compare it to others? Seriously though, we are working on privacy settings in case you’d like to keep your Collection private. In the meantime, if you’d like to remain anonymous, we suggest you create a Username that isn’t easily identifiable with you or your social media accounts.
Adding Sneakers to your Collection or Cop List
First, create an account. Gotta do that.
Then, there are three ways you can add sneakers to your Collection or your Cop List. 1) by Search; 2) Quick Add; and 3) from a sneaker profile page.
1. Search (“Add Sneakers” link): On your Collections page you will see an “Add Sneakers” link in the middle of the page. Click that, search for the shoe you want, select it and then follow the instructions on the page. The only required information is sneaker name. After that, nothing is required, but the more data you give us, the more we give back. It’s the golden rule of data…we think.
If you don’t provide data for the other fields, however, default data will populate your Collection.
Here’s how the virtuous cycle of data works when using “Add Sneakers”:
| Data Point | Required? | Will Default to… | Why You Should Care… |
| Sneaker Name | Yes | Nothing gets added | We shouldn’t have to explain this |
| Size | No | The size in your profile | Big shoe sizes mean…big socks |
| Condition | No | Deadstock | Pricing info about your Collection will be more accurate as we return market value based on condition |
| Purchase Date | No | Retail Release Date | All data about your Collection will be more accurate, as we calculate all stats on a monthly basis |
| Purchase Price | No | Retail Price | Gains/Loss over time will be more accurate, as we calculate profit as Market Price minus Purchase Price |

2. Quick Add (from the Price Guide): When browsing the Campless Price Guide, you will now see a “Profile” button underneath each sneaker. When you hover over the “Profile” button the following options appear — “+Collection” and “+Cop List”. You can click either, the desired action will take place and you’ll get a nice little green confirmation in the bottom right of your screen. We’ve put a red circle on top of the screenshot below to show you where the two buttons will appear . . . please don’t email us asking where the red circle is on your screen.
This is the quickest way to add a lot of sneakers to your Collection but they will get added with the default data as described in the “Add Sneakers” section above. You will have to go into each shoe later and edit the sneaker data to make sure your personalized data is as accurate as possible.

3. From a sneaker profile page: To the right of the sneaker picture there are two new buttons: “Add to Collection” and “Add to Cop List”. Clicking either will take you to the “Add Sneakers” page described in section 1 above. Again, the red circle you’re seeing below does not exist on the website so stop emailing us about it.

Collection Details
A small sampling of Campless founder Josh Luber’s collection appears in the screenshot below. And we mean small. He’s got 60 pairs under desk.

The Chart:
The combination bar chart / line graph in the middle of the page shows three data points, by month, over the past 12 months:
- Total number of DS pairs in your Collection (light blue bar)
- Total number of Used pairs in your Collection (dark blue bar)
- Average price by month, all shoe (green line)
My Totals:
The “Collection Totals” section in the upper right gives you the actual numbers of the most important stats, plus shows how your Collection ranks against every other Collection in terms of volume, total market value, average price and Campless score.
- Sneakers = Total number of sneakers that you’ve added to your Collection
- Market Value = Total market value of your Collection, as calculated by adding the individual market value of each individual shoe. Market value of each shoe is tied to Average Deadstock Price, but varies based on condition.
- Average Price = Market Value divided by the number of sneakers in your Collection
- Campless Score = The average Campless Score of all of the sneakers in your Collection. For a refresher of what the Campless Score is, please refer to this page.
Viewing Your Collection:
There are two ways to view your own collection: “List View” and “Cards View”. You can toggle between the two by clicking the buttons directly under your graph.
- List View: The screenshot above is what we call “List View”, because, well, it’s a list of sneakers. Duh. You can sort the list by clicking each column header: Condition; Size; Purchase Price; Market Value; Gain/Loss; Campless Score.
- Card View: The screenshot below is what we call “Cards View”. This should look familiar to our loyal fans who’ve browsed our Price Guide before. This view is also sortable by clicking on the drop down menu below “Sneaker Rankings By”.
List View is best for quickly seeing data for each sneaker in your Collection, and is the only place where you can see Gain/Loss data (by shoe and in the aggregate). Card View has bigger pictures and is prettier.

Editing and Deleting Sneakers
We highly recommend that you keep your Collection as current and as accurate as possible. If the first rule of Collection is “the more data you give us, the more we give back”, then the second rule is surely “the more accurate data you give us, the more accurate data we give back.”
Here’s how:
- In List View, you’ll see an “Edit Collection” button directly next to the “Add Sneakers” button. Click that.
- To delete a sneaker from your Collection, click the radio button in the far right column and then click the trash can icon. You can delete multiple sneakers at once.
- To edit a sneaker click “edit” that will appear next to the sneaker’s Campless Score. That will take you to the “Add Sneakers” page where you can update all inputs. So if finally break out those grails and unds them, make sure to edit your Collection and mark them as used. Just saying.

Well that’s all the Collection instructions for now. Have fun with it. Show your friends. Share it in social media. But remember to keep your data accurate and current.
Oh, also, we’re giving away 73 pairs of sneakers. Did I forget to mention that? Not sure anyone would really care. Maybe check out the next blog post…